


A bit late in sharing this, but I did a guest post over at Grosgrain to celebrate Kathleen's coming patterns. For a whole month, she has a whole bunch of tutorials and patterns from talented people from all over the blogosphere. I am honored that she has asked me to be one of them.
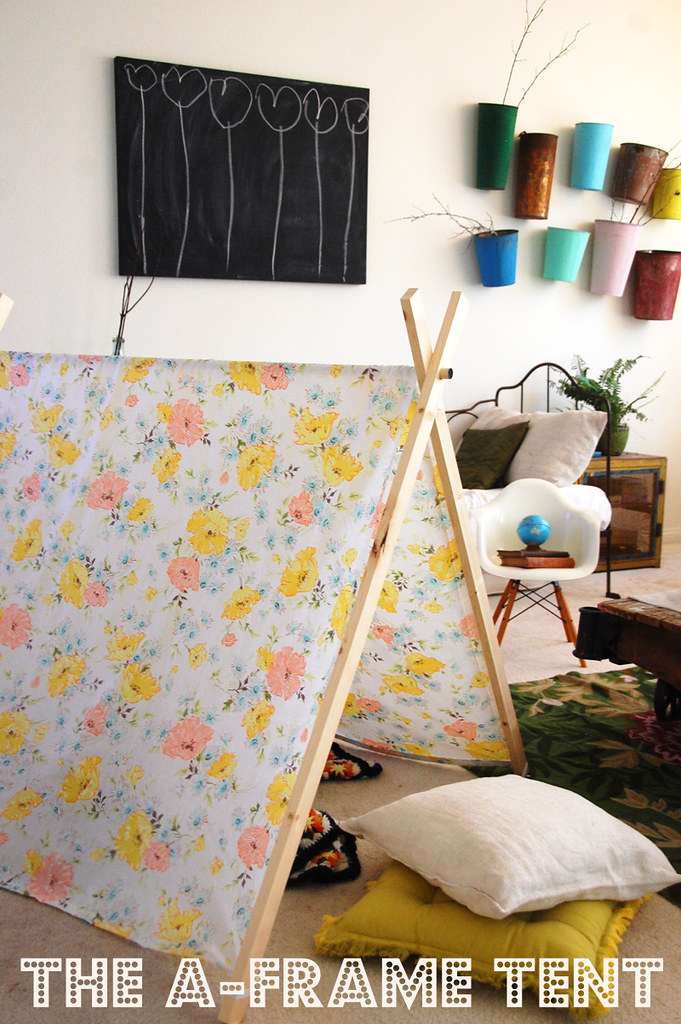
So for you (and her readers), I made this tutorial of a fun little hideaway (see guest post here) for your little ones or maybe for you. I am sure after you make this and call your kids over to show them, they will be over the moon and will be thanking you like crazy!
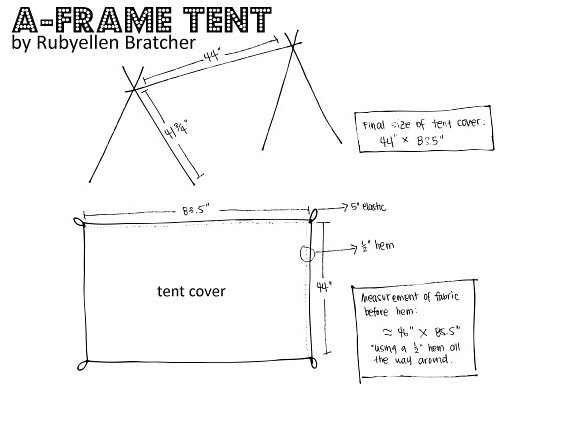
Drawn pattern for reference:
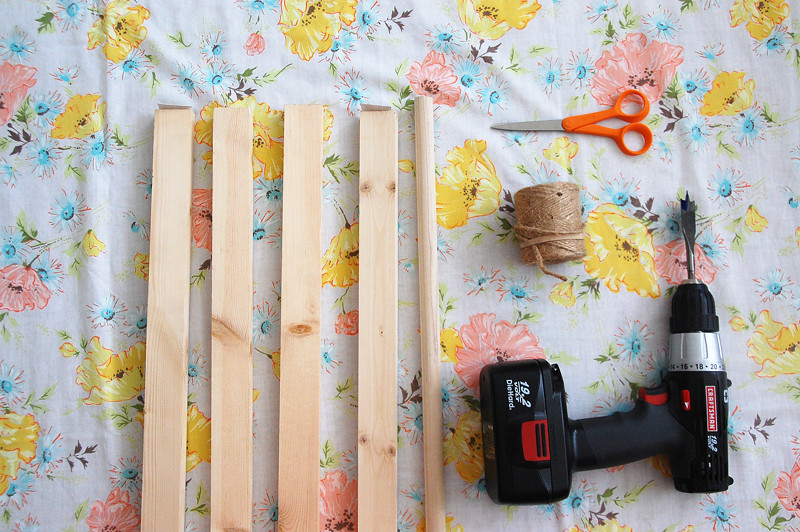
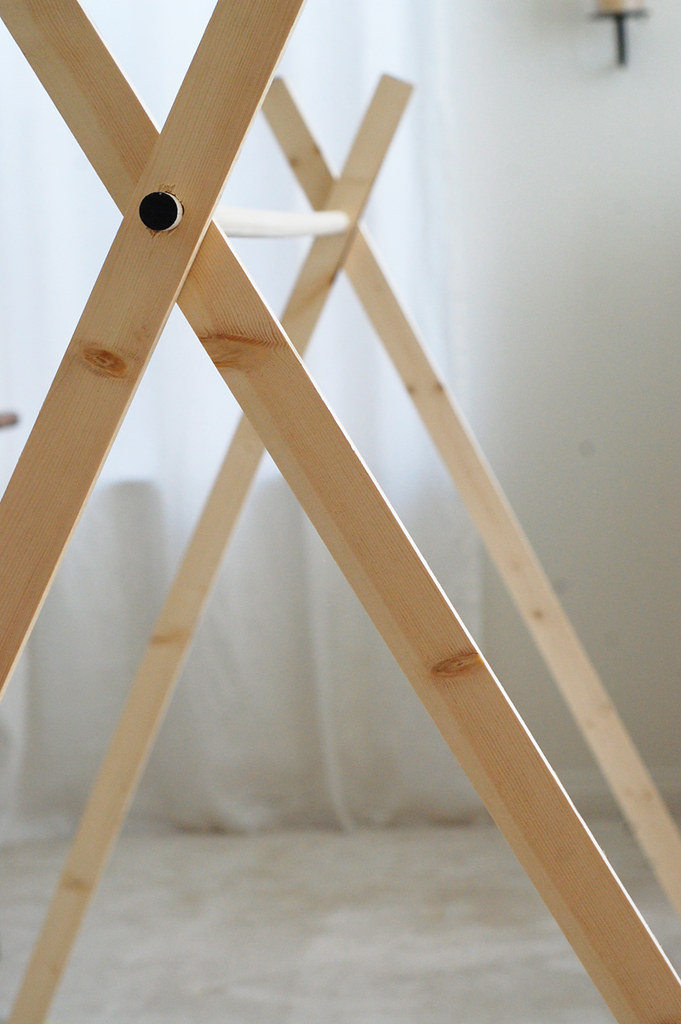
Materials for the A-frame:
4- 1'' x 2'' x 48'' whitewood moulding
1- 3/4'' x 48'' poplar dowel
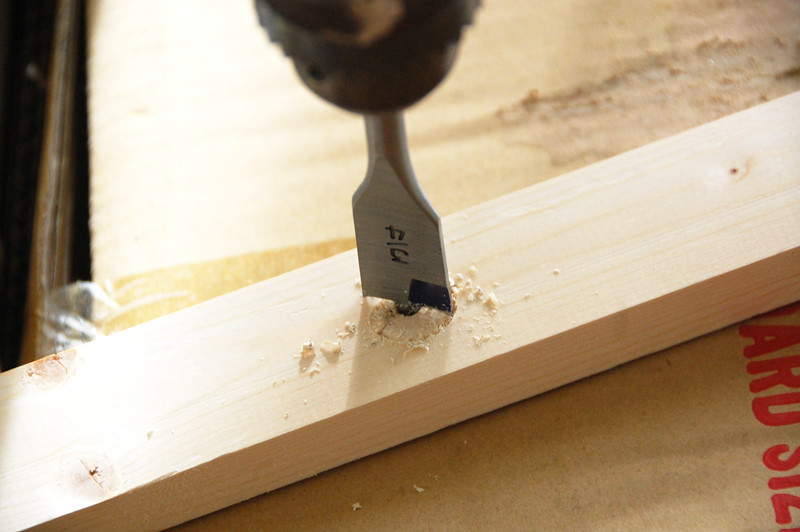
drill with a 3/4'' spade bit
measuring tape
pencil (marker)
(I was going to use the twine to make sure the mouldings stayed in place, but I no longer needed to because the hole already had such a tight grip on the dowel).
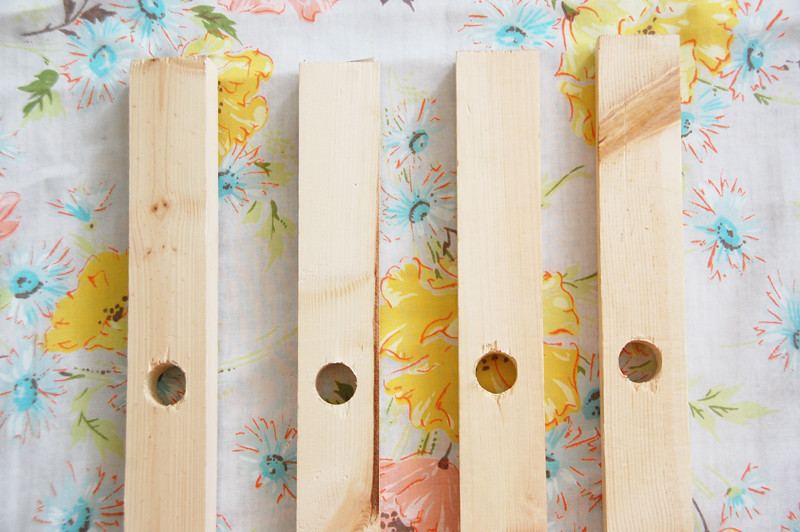
1. From the top of each of the 4 mouldings, measure and mark 6'' down with your pencil.
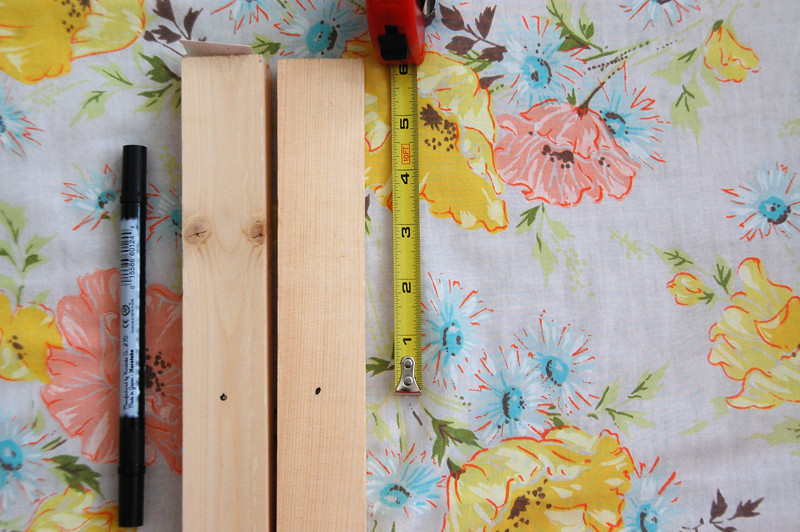
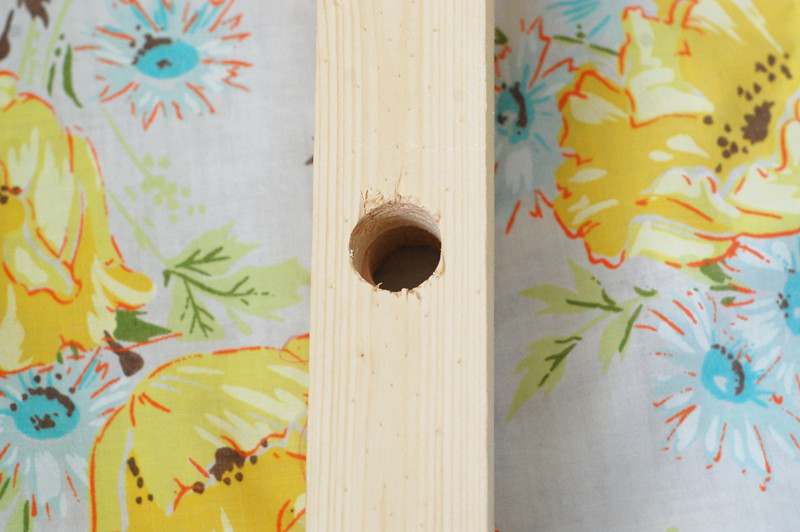
2. With your drill and 3/4'' spade bit, drill a hole at your mark. Try to center the hole on your moulding.
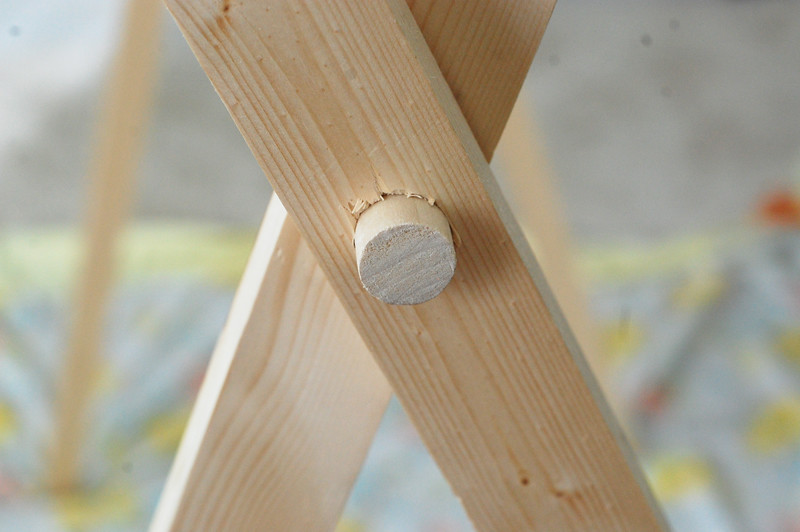
3. Place 2 mouldings on top of each other, make sure the holes are lined up.
4. Push dowel through the holes of the two mouldings. The hole should have a pretty tight grip and keep the dowel in place.
5. Repeat step 4 and put together the other side with the two remaining mouldings.
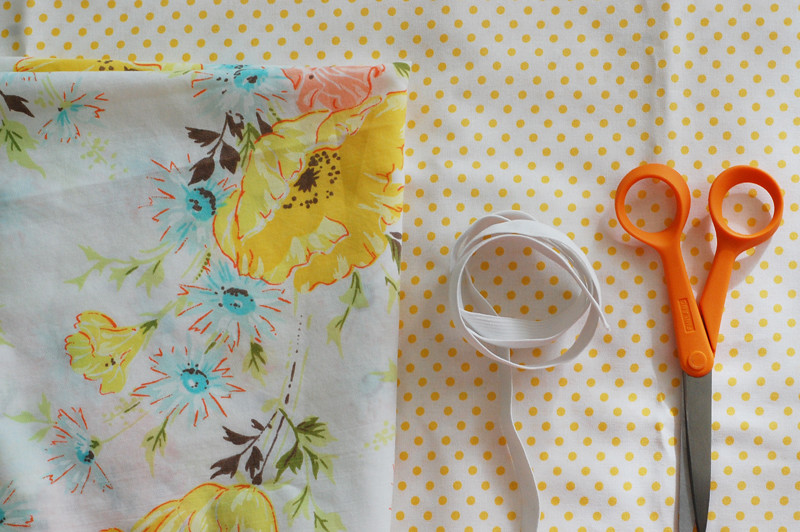
Materials for tent cover:
- fabric large enough to cover frame (approx. 46'' x 85.5'' un-hemmed; 44'' x 83.5'' hemmed)
- coordinating thread
- elastic
- scissors
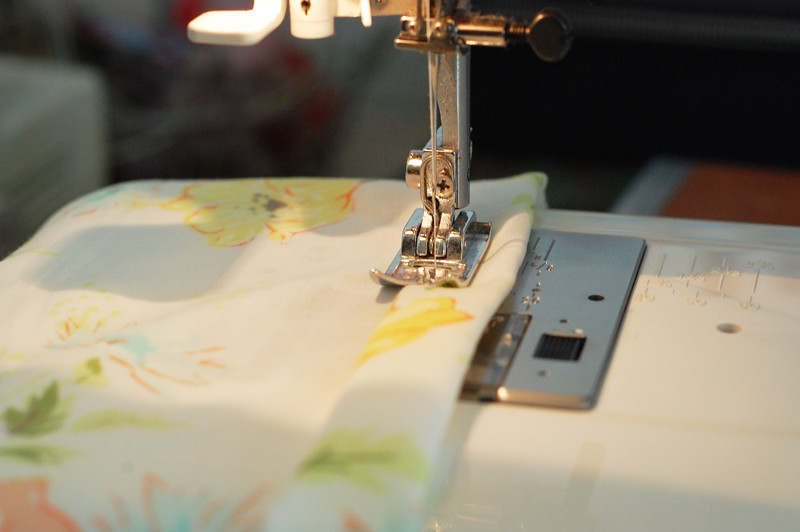
1. Hem the perimeter of the rectangular fabric using a straight stitch with a 1/2'' hem. Desired size of the cover is 44'' x 83.5''.
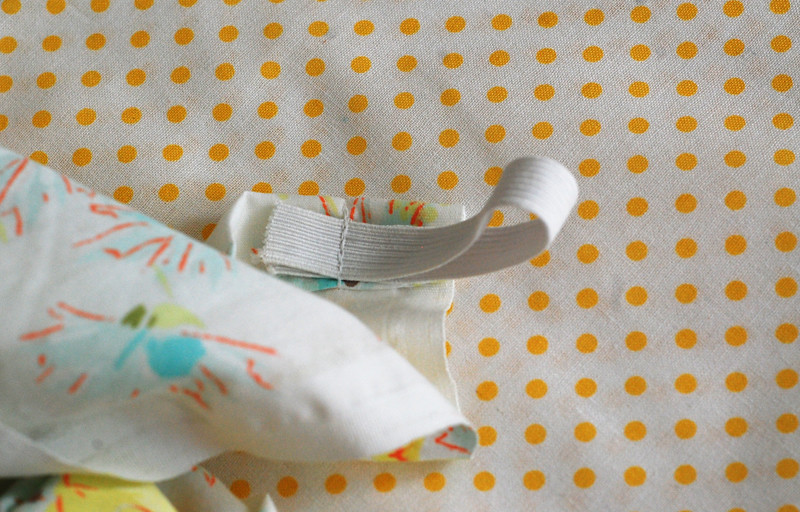
2. Cut 4- 5'' inch elastic strips.

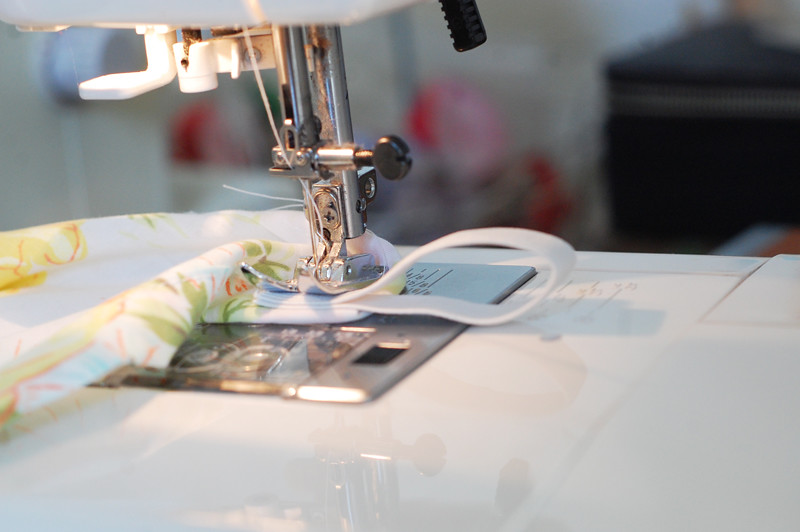
3. Fold elastic over and pin in place at each corner of the tent cover.
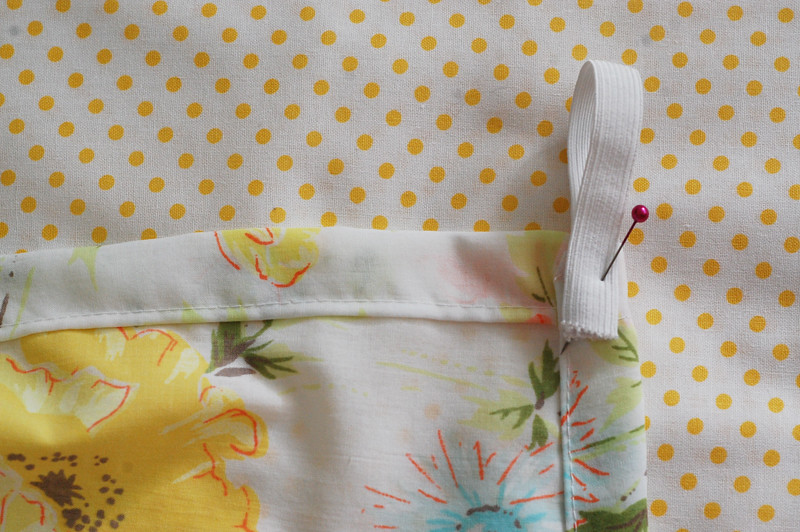
4. Sew elastic onto the corner of the tent cover. Repeat with the remaining 3 corners.
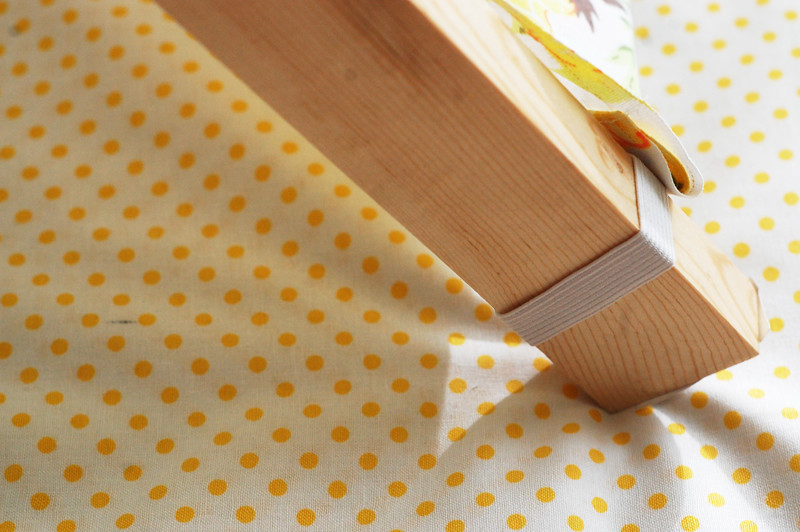
5. Drape cover over the A-frame and loop elastic to the bottom of wooden tent leg.
6. Arrange and straighten fabric cover. Then, spread frame to desired height and width of tent opening. Call your kids over and enjoy!!!
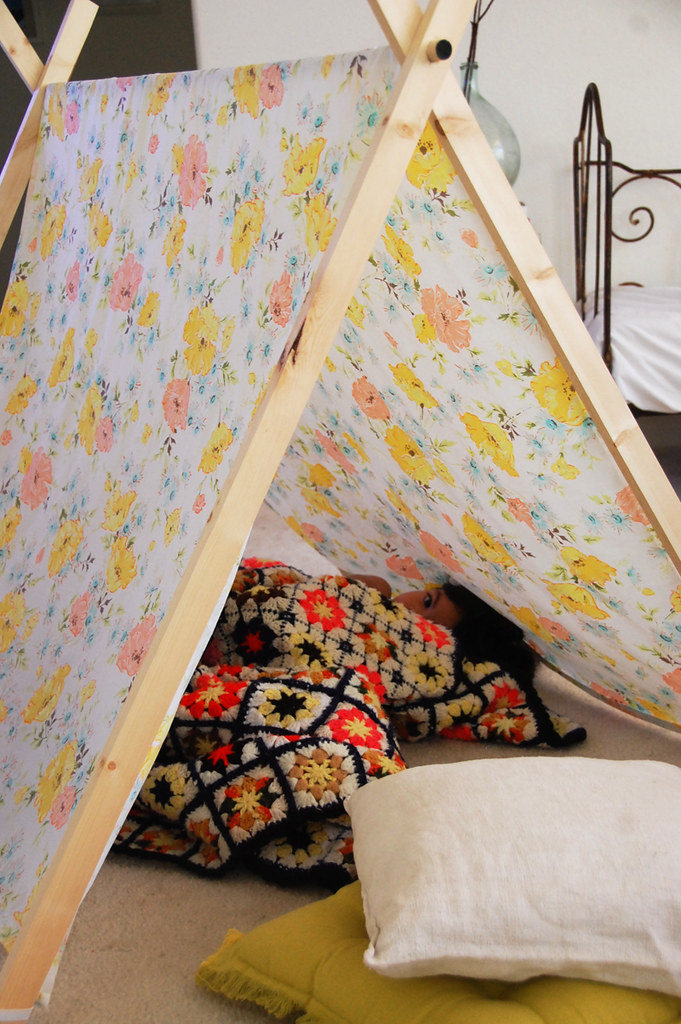

This tent can easily be taken apart and stored, since there are no screws or nails involved. In addition, the tent cover is easy enough to recreate in different patterns. The sizing is similar to a twin bed sheet, so if you get one of those to use (I used a vintage twin sheet), the project just got a whole lot easier!
It is a great place for reading, napping, and pretending, but most importantly making memories! I am already thinking this will be my go-to birthday gift as I am sure this would be loved very much. Don't you think?!!
Thank you Kathleen for allowing me to take part in your celebration! Make sure you all stop by her blog and see all the new patterns/tutorials popping up daily. I love making little things for my girls to play in and now I am already thinking of another one! There is no such thing as too many hideouts for a little kid!


just strolled onto your blog (from smile & wave) and now i'm obsessed!!! you have such an adorable family and you're so creative. i'll be sure to swing around more often, keep it up :)
ReplyDeleteyou know how to use a drill?!
ReplyDeleteThis is amazing!!! I am totally making one! I also am VERY curious where you got that amazing coffee table? Or did you make it? Where did you get the casters?? I've been wanting to make one FOREVER but have been wanting large casters. Let me know if you can...I'd appreciate it!! Great job on the tent!!!!
ReplyDeleteThis would have been so nice a week ago and much better then the one I ended up making and posting on my blog today, lol. Love that tent!
ReplyDeleteWhat a nice idea !! love this tent and really love your blog ^_^
ReplyDeleteFirst time reading your blog - found you when voting on the 25 top style blogs. The a-frame tent is gorgeous! Definitely need to make one for my little girl.. Look forward to continuing to read your blog xx
ReplyDeleteOh thank you so much for this! I've been trying to figure out how to make a simple children's photobooth at home, without nails & screws and one that can be set up and taken down easily! I'm sure with a few tweaks & a polaroid camera your tent can be transformed into a brilliant home made photobooth :) Love love love your blog!
ReplyDeletei love this project. i think this would be great for my nephew. thanks so much for sharing!
ReplyDeleteoh my goodness, that's so CUTE! thank you for sharing. maybe one of these days i'll create one of these ;)
ReplyDeletehappy wednesday!
Super cute tent!! I just read your last post also about homeschooling. My daughter is in K right now and I am thinking about homeschooling next year . I'm a little nervous about getting started. Homeschooling is not what I want to do, but I am realizing that this is what is best for my kids. I know I will be able to do it with God's help. Nice to know there are other mom's just getting started.
ReplyDeleteI AM IN LOVE WITH THIS IDEA. I'm going to try it this weekend. My neice would love it.
ReplyDeleteThis is so cute, thanks for sharing! I just made a tee pee for my daughter and this looks a lot easier :-) I'll have to make one of these too!
ReplyDeletekelsey- the coffee table is vintage piece that we picked up at the flea market. i think it used to be attached to some sort of train or something, but i am sure you could recreate something similar using old wood and casters. The table is quite heavy and heavy duty and the wheels are cast iron, so my parents freak out every time they see it, but we absolutely love it!
ReplyDeletei am glad you all like the tutorial. i already can't wait for the next kid birthday party to make this and give as a gift!
RUBYELLEN!!! this is darling. i will have to make one for my littles one of these days. i'm the big bad email wolf. i'm so sorry. i will write tonight. :)
ReplyDeletekisses!
love!
ReplyDeleteinspiring as always Rubyellen - I always love your fabric choices for your projects your world is a rainbow of happy prints!
ReplyDeleteAAamazing job Rubyellen! i almost want to just do one for me! for my quiet time!
ReplyDeletelove love love. perfect timing for me too, i'm babysitting my nieces in 3 wks and i wanted to make them a tent to play in. so glad you put this tutorial up, beautiful tent Ruby.
ReplyDeletethank you!!
You're brilliant! I would love to hang out in that beautiful creation!
ReplyDeleteThis is absolutely brilliant! I think I might suggest this for one of our upcoming monthly craft clubs! Thanks so much for sharing it with us.
ReplyDeleteI LOVE this and will be doing it immediately!!! I'll be sure to take some photos and send them to you once I've done it, so fun!
ReplyDeleteooh this is soo sweet! perfect job well done! :D
ReplyDeleteYou can see the one I made here
ReplyDeletehttp://thehandmadehomemaker.blogspot.com/2011/05/yard-sailing-we-will-go.html
Great tutorial!!!!
How sweet and cute is that? I think my Little Guy needs one stat!
ReplyDeleteErika
www.kitschdesigns.com
This is so great!!! What a wonderful tutorial!
ReplyDeleteI would love for you to stop by my blog and share this at my For the Kids link party! Stop by and join in on the fun!!!
http://sunscholars.blogspot.com/2011/05/for-kids-friday-9.html
this is SO darling!! i'm hopping over from centsational girl and just had to give you major props. i'm totally making this for my kids this summer!
ReplyDeleteThis is perfect. I did a little feature with a link back on my blog. I do hope that is ok. Your blog is truly one of my favourites x
ReplyDeleteI love this! I sent it to my brothers because it reminded me of the hours we spent playing under my Mom's quilting frames that she would set up in the living room. this is such a fun summer project I can't wait to try it!
ReplyDeletethis is so awesome!! i definitely need to bookmark this for when we have kids :)
ReplyDeleteMade one for my dd and she is LOVING it! Thanks for the inspiration!
ReplyDeleteOh my goodness!! Thankyou for sharing this! So simple - so effective! I just showed my daughter and she said "that is just what I have always dreamed of!" looks like we'll be making one this weekend! :)
ReplyDeleteHI! Came from grograin and my kidlets are playing in their new tent as I type! Yeah for something fun on a rainy spring day. Thanks!
ReplyDeleteI am making this for my son's birthday next weekend. I am off to the lumber yard today! He's having a camp out themed party. Perfect timing!
ReplyDeleteoh me oh my!!! LOVE THIS!!! I have three little boys that would LOVE this, and I wouldn't have to drag out the card table!!! BLISS!!! THANK YOU!!!
ReplyDeleteThank you, thank you, thank you! Just made my version yesterday! I love it (and so do they!) Now a follower of your fabulousness.
ReplyDeletehttp://snipandsnail.blogspot.com/2011/05/frame-tent-plus-day.html
Made it, love it, blogged it here:
ReplyDeletehttp://highmaintenancehippy.blogspot.com/2011/05/creating-and-restoring-memories.html
Thankyou so much! :)
LOVE I WILL be making this! Thanks so much for sharing!
ReplyDeleteHow lovely! Stopping in from Rae's or Dana's. Can't remember but I'm glad I'm here. This is something I could make, I think.
ReplyDeleteJust found your site last week. Love love love!! Made this tend and posted about it today. Thanks for the inspiration!!
ReplyDeleteLOVE LOVE LOVE. can't wait to make it! thanks so much! and you're right.. this is a great gift idea.
ReplyDeleteI just made one too! Come see! http://yvette-keeping-it-real.blogspot.com/2011/06/medic-tent.html
ReplyDeletelove this! planning to make one soon, but wondering...is a fitted twin sheet enough fabric? or do you need a flat sheet? thanks!!
ReplyDeletelove this idea! thanks for sharing! i also LOVE LOVE the vases on the wall in the background!! did you make those yourself too?
ReplyDeletejust made this...have to put it all together yet..i added pockets to the inside for treasures or books...
ReplyDeletekristin- i used a fitted twin sheet but found there was not enough fabric...(meant to grab a flat but accidentally bought a fitted)...i ripped out the corner seams and then used as much material as i could but had to add about 15+1/2 inches of another fabric to it so it was wide enough...would definately use a flat sheet if it was available...it was pretty time consuming to have to measure and add the extra...anyways..hope this helps a bit?
THANKS FOR THE TUTORIAL!!! LOVE IT! :)
-heather
this is amazing! thank you so much for the tutorial
ReplyDeletedani
I am with @Adele, I want to know more about the vases on the wall.
ReplyDeleteYEAY! This is adorable!! Tents bring back so many great memories! This is just too cut not to Pin!! If you don't have a Pinterest account..there is a link on my page. I just found your blog through another blog and I am so glad I did!
ReplyDeleteHere's mine!
ReplyDeletehttp://sewingorsomething.blogspot.com/2011/06/kids-play-tent-for-under-10.html
thanks for the tutorial!! LOVE IT!
hi darling,
ReplyDeletei used this tutorial to make the tent for a photoshoot. i hope you like it: http://sweetdayswithelleandmia.blogspot.com/2011/06/dont-sit-under-apple-tree.html
xxxxxxx
Wonderful tutorial. Low cost and simple! Great for people who lives in small space. We sewn a fabric band for the top because we have wooden floor and the tent won't stay up. : )
ReplyDeleteThanks! A lot. I made it today, with a little help, but the children are so happy with it. I also posted about it: http://bijdemolen.blogspot.com/2011/07/count-your-blessings_24.html
ReplyDeleteHave a nice week!
I am preparing a safari/jungle theme for my grade 4 class this year and was looking for a safari style play tent. I only saw 1 but it was waaaaaaaay too expensive. I love your idea! It's easy, quick, inexpensive, and safe and even I can do it. I am buying some animal print fabric this weekend and making 2 for the class for silent reading time. They'll love them! Keep up the good work. I'll be at your site often now that I've found you.
ReplyDeleteMarlene
I have been meaning to make this forever and just finished it! thank you for sharing lady!!
ReplyDeletehttp://makeitdear.blogspot.com/2011/07/diy-frame-tent.html
I this today but well i just dont have an nice material to put over it :/ i dont have a lot of money either what can i do? I've asked family and friends too and they dont have anything i can use <3
ReplyDeleteharrie- i would try the thrift store it is basically a twin bed sheet.
ReplyDeleteThank you so much for this tutorial! Made it yesterday (only the second time I've sewn anything) and it turned out awesome! What a fun tent for my daughter, and a great way to practice my sewing skills! : )
ReplyDeletehttp://artistwifemom.blogspot.com/2011/07/cakies-tent.html
I just want to say thank you for making these because these are going to make 3 little girls some very great Christmas presents. Also I just found some really cute material at walmart that has two different patterns of 2 yards each for $8.00. I bought two packages of each kind for the tents and I will just be sewing the two like fabrics from each package together lengthwise to make the one big panel for the tents. Then I will use the other fabric for either another tent cover so they can change them out or make a pillow and blanket to go with it.
ReplyDeleteI'm excited to make a couple for my preschool! Thanks so much:)
ReplyDeleteThis project is genius! I've already put it on my husband's "to do" list!
ReplyDeleteThank you so much for sharing the great turorial. I hope you don't mind, we crafted our own version and linked to your blog!
ReplyDeletehttp://web.me.com/marawolff/Adoring_Audrey/Blog/Entries/2011/8/8_Audrey’s_Room_Tour_%7BPart_Two%7D.html
Thanks! i'm totally making one for my baby's birthday party next month:)
ReplyDeletei just made one for my little guy! totally great idea! i love it.
ReplyDeleteThe table is quite heavy and heavy duty and the wheels are cast iron, so my parents freak out every time they see it, but we absolutely love it!
ReplyDeleteKids Play
I love this! Thank you!
ReplyDeleteThat is fantastic!! I'll definitely be getting by husband to help me make one ;-)
ReplyDeleteThank you for this tutorial, fun to make! I added straps to hold the tent open as it's going to sit on a tile floor, and I attached the tent to the frame with velcro. http://www.flickr.com/photos/8367758@N02/6165240802/in/photostream
ReplyDeleteI want one for myself! The kids can get their own. LOL
ReplyDeleteHow cute! Shared it on http://minipiccolini.com/2011/09/diy-play-tent/.
ReplyDeleteSo special and so simple! I am going to make one of these for my lad for Christmas - I wish I'd seen it earlier, I could have made it for his birthday last week :)
ReplyDeleteOh! I cannot wait to try this! Thank you so very much!
ReplyDeleteI just put this on my "to make" list! awesome!
ReplyDeleteHello! Just made this to fit over my 18 mo. old son's bed (which is really a twin mattress on the floor). Followed your instructions pretty closely, but added binding to the edge of my fabric for a more finished look and also used several ribbon ties down the sides to prevent sagging. Here's the finished product:
ReplyDeletehttp://www.flickr.com/photos/23671443@N02/6314812249/
I also added a couple of straps between the "legs" on the bottom to prevent the whole thing from collapsing flat, (since this is more a permanent installation than your portable version)
Thank you so much for sharing this brilliant idea and super-simple tutorial!
thank you for a lovely tutorial. made one for my boy over the weekend - he simply loves it.
ReplyDeletei found that adding two more dowels to hold the legs made the frame much stable.
http://sewnforyou.wordpress.com/2011/11/21/and-yet-another-one-for-once-upon-a-thread-harry-and-the-dinosaurs-first-sleepover/
-jinny
Wonderful tutorial! I'm sharing this on my "Gifts for Girls" day in my Christmas series. Thanks for the inspiration!
ReplyDeleteAloha,
charlie
I love ideia, I'll try
ReplyDeleteI am in process of making this now for christmas gifts. My tent is a little wobbly. Any ideas to stabelize? The dowel doent have tight fit, any hardware i should add?
ReplyDeleteSo I bought the wood and dowls and spade bit. But the when I put the dowel through it is just enough loose that the wood legs slide down to the ground... I want to make this for my 4 boys for Christmas next week but I'm not sure how to solve this problem... please help
ReplyDeleteMayka
I used a twin flat sheet, so I sized the whole thing up. Since the dowel rods only appear to exist in 48" lengths, I ended up using 1/2" PVC piping (that electricians use for running wire) which I could easily cut to the 74" I needed. I did have to get a pair of PVC cutters but they were $12 and I adapted the spade bit to be 7/8" instead. I love it - thanks for the idea!
ReplyDeleteI did it! I made the tent per your instructions, which were great!
ReplyDeleteThanks.
Take a look:
http://www.momslittlerunningbuddy.com/2012/02/frame-tent-done.html
I Love this tent, thank you so much for the tutorial. I made mine from a set of vintage Laura Ashley curtains and used a broom handle for the ridge pole. You can see it here http://yearinthrift.blogspot.com/2012/02/play-tent.html my children love it, i think i love it more! Thank you!
ReplyDeleteTo keep the legs from sliding the tent flat, I'm thinking of trying rubber cement glue, no-slip carpet lining, or maybe a piece of rubber matting for furniture legs. I love this tent craft! Reminds me of all the temporary tents my sister and I made when Dad would trim the mimosa trees back.
ReplyDeleteYou've inspired me! Made this tent for my daughters and they just love it. The first word that came out when my eldest one saw it was "WOW". It just made my day. I use strings to secure the legs and dowel as my daughter loves to shake it. I've linked your instruction on my blog. Here is a sneak peak of our version: http://neischoice.blogspot.com.au/2012/04/tent-girls-lil-chilling-place.html
ReplyDeleteThanks again for the inpiration!
Cheers,
Susan
Such a great tutorial. I only hope I can remember where it was when I get ready to make it. I tried to pin it to Pinterest, which is where I bookmark my links these days, but it wouldn't let me. :(
ReplyDeleteAbsolutely love this tent! (Wish I could share it.)
ReplyDeleteThank you so much for sharing this! I just made one for my daughter and she loves it. I love that you can easily wash it! We'll be taking it to the beach all summer. :) Thanks again!!
ReplyDelete