


Materials:
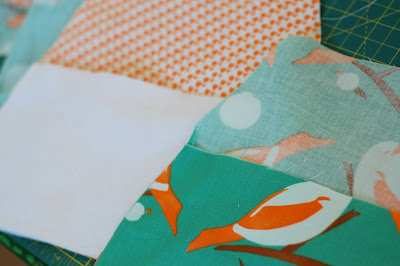
1- 2 fat quarters (but is more than enough fabric) of different fabrics (1 for lining and 1 for outer fabric)
1- Stiff interfacing that matches
Elastic cord
Button
I like to use .25 inch seam allowance.
 7. Stitch around the perimeter, but leave an opening so that you can turn it inside out.


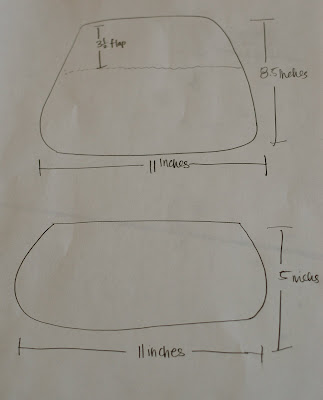
1. Cut out your interfacing fabric (1 of each piece below, you can see the measurements I use, but anything you like will work). I like to use rounded edges on my clutch!

2. Then place your cut out interfacing on top of the lining fabric, pin, and cut out (2 pieces should result).
3. Next, place interfacing on top of outer fabric, pin, and cut out (2 pieces should result of the outer fabric).
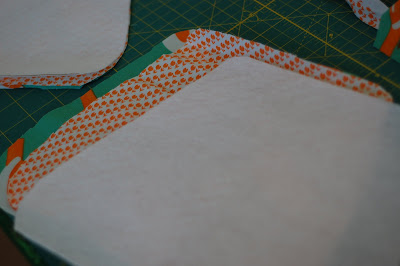

4. Sew right sides together for the outer fabric.
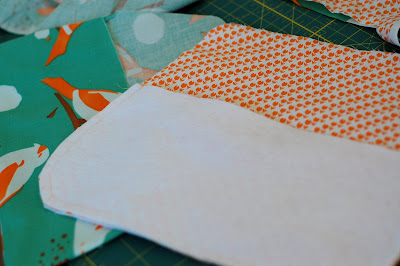
4. For lining... place interfacing, then lining right side face up, the lining fabric wrong side face up, then coordinating piece of interfacing and sew it together.
 4. Turn and iron fabric.
 4. Turn and iron fabric.
5. Place your lining inside your outer fabric.
6. Pin elastic cord centered at the top of the flap (I always forget to do this!).
 7. Stitch around the perimeter, but leave an opening so that you can turn it inside out.
8. Turn inside out and iron again.
 9. Edge stitch around the edge so that the opening will be closed and iron again (Okay, I don't really iron all that often, but it does help keep it nice and neat!)
 9. Edge stitch around the edge so that the opening will be closed and iron again (Okay, I don't really iron all that often, but it does help keep it nice and neat!)
10. Sew button onto bottom and "Voila!"

So quick and easy... and great for a night out or as a gift!
Sorry if it doesn't quite make sense, but it really is super easy and quick... and is brainless to figure out!
So in honor of a Happy Monday I am giving this quick, sweet clutch away...
Simply, leave a comment on this post and on Friday morning (after a wonderful week of work and plus everyone looks forward to Fridays), I will announce the winner!
Good luck!!!


Love the purse and your eye for detail! Great work!
ReplyDeleteI love your creative projects. This is so cute! I wonder if I could figure out how to make one.
ReplyDeleteooh, fun, I'm gonna make one with my Sophia fabric, of something. I get so indicisive when it comes to fabric selections because I love them all!
ReplyDeleteThank you!
over here, over here! send it to florida! very very cute, but when do you find the time to make stuff??
ReplyDeleteHappy Monday to you too! I hope I win cause it's super cute!
ReplyDeleteOoh. I'm so excited. I love your combo of fabrics
ReplyDeleteWhat a perfect project for my guild quilt show boutique. Thanks for the inspiration and instruction.
ReplyDeleteWay cute--I'm going to have to make some with my scraps for my girls to use. They would be so excited to have matching clutches to some of their outfits. Unfortunately for me they are already turning into fashion divas.
ReplyDeleteMEMEMEMEMEMMEMEMEMEEEEEEEEEE...YOU ARE SO TALENTED AND ARTISTIC AND WITH 2 BEAUTIFUL BABIES YOU STILL FIND THE TIME. I AM IN NO WAY ARTISTIC BUT CAN SEE A BEAUTIFUL PIECE OF WORK AND IT IS SOO CUTE!!!! OK ENOUGH BUM KISSING...;)
ReplyDeletePick Me! this is such a lovely clutch- I'm in love :)
ReplyDeleteI love the pouch! I've got to make me one...
ReplyDeletethey have some really cute vintage buttons on etsy....i got some really great deals on ebay a long time ago, but lately they don't have anything reasonably priced on there...still not as fun as finding them when i'm out antiquing/thrifting tho!
ReplyDelete"e" won't be official for a little while. hopefully we'll start 'official' visits in the next couple of weeks. so we'll drive back and forth for her to spend weekends with us in jacksonville (she's not local - she's 2 1/2 hrs away - so hopefully that doesn't last more than a month coz enzo lasted 2 months!) then 90 days AFTER she moves in with us, we'll be able to finalize in court.
This is adorable and I love the little button you added!
ReplyDeleteOh, that is adorable. I love the little button! Count me in!
ReplyDeleteit's adorable. i hope i win!!!
ReplyDeleteOrange is my favorite! I love the fabrics you chose--orange and turquoise look fabulous together.
ReplyDeleteso cute and vintage looking! count me in!
ReplyDeleteelkmeese at yahoo.com
This purse would be perfect for my quilt guild show boutique, thanks so much for the instructions. I would love to win that little beauty!
ReplyDeleteGreat work there. Generous of you to show how to.
ReplyDeleteSuch a great little purse! Thanks for sharing the project info!
ReplyDeleteThat's adorable! Send it halfway around the world ;)
ReplyDeleteThis is fabulous - wish I had the time and talent to do something like this. Please count me in!
ReplyDeleteamateurdelivre at gmail dot com
Super cute! I've gotta give it a try.
ReplyDeleteLove the fabric.
ReplyDeletedolls123[at]gmail[dot]com
Adorable!!!! I would soooo love to win!!! Thank you so much for the opportunity!!! have a great Wednesday!
ReplyDeleteohh, how cute is that? and easy too!!
ReplyDeleteI'd love one!!
Deana
http://justdeesarts.blogspot.com/
I love the fabric you used for this one... so spring! And your design is really cute too... thanks for the instructions!
ReplyDeleteOh, that's just lovely. Count me in!
ReplyDeleteThanks for this great giveaway.
Btw, I'm having THREE GIVEAWAYS combined on both my blogs. Hope you'll stop by.
Thanks,
aBookworm
http://abookwormsdiary.blogspot.com/
http://abookbloggersdiary.blogspot.com/
Wow! That's adorable. I wish that I could sew...
ReplyDeleteThat's cute. Thanks for the chance.
ReplyDeletethis tutorial didn't work for me! :( can you clarify how the pieces are to be turned before you sew them together? is the interior right side out and the exterior inside out? i ripped it apart several times and can't get it and thought i had it finally...but the interior fabric is on the outside! haha
ReplyDeleteHm so this totally didn't work for me either and I wasted material trying to figure it out... I think there are some steps missing or something. You might want to re-write this! Your bag turned out nice however!
ReplyDeletethese directions are confusing...I've made a few bags this way, so for anyone that finds this blog and is confused, here is what you do:
ReplyDeletewhen you sew the inside and outside pieces together, you want the outside piece INSIDE OUT, and the liner RIGHTSIDE OUT. Put the liner IN the bag (this will make sense later), and sew around the perimeter of the flap and the top of the bag. Leave a small hole, then pull the bag out through the hole, and fold and sew the hole shut. You can then stuff the liner into the bag and will need to iron to smooth everything out.
What a cute clutch! Great tutorial. I am definitely going to try making one or more of these. Thanks for sharing!
ReplyDeletewow...awesome, a very small word to describe this clutch and your work.... ......love it, love it, love it,it sounds so easy when u explains..........I will try to make one by friday and gift it to my niece.... I am making one in turquoise on the outside and pink in the inside....Thank you for the great tutorial.. :)
ReplyDeleteI like the simplicity and dignity of this pattern.
ReplyDeleteAck, sorry new sewer here, but i am a little confused with the steps. The end result looks simple enough but the order of piecing the pieces together seem a little confusing to me. Please help!
ReplyDelete